





Our article will help you to accurately install the Cheshire Mouldings Reflections Glass Balustrade range of staircase parts. It can be difficult to know how to fit a glass balustrade to achieve a stunning, high-quality staircase that completely transforms the look and feel of your home. This is why at Blueprint Joinery, we’ve created three articles to help you safely and precisely install a glass balustrade by yourself. These articles are:
- Part 1 - Base Rail and Newel Post Installation
- Part 2 - Handrail and Glass Panel Installation (current article)
- Part 3 - Landing Installation
Introduction
An easy way to transform your home is by focusing on your staircase. This is a focal point in your home that often gets overlooked, being left to grow tired and negatively impact the look and feel of every space in your property. Our popular Reflections range of DIY glass balustrade can breathe life into a tired staircase and create a modern, bright, stand-out feature that adds style to your home. Not only is it extremely simple to install for those who can do a spot of DIY, but the glass panel will also give your staircase a refreshed and brighter space that you love. With this balustrade, you can forget about traditional wooden spindles and have a stylish, more contemporary stand-out feature that brightens your home instantly.
We know that it can be difficult to know how to install a glass balustrade on the stairs, so we’ve provided you with easy-to-follow installation instructions for the base rail and newel posts in the rake section. What’s more is that we stock everything you need to install your new staircase with no hassle. Find high-quality glass panels, handrails, base rails, newel posts, fixing kits and so much more in our collection for a stunning staircase that’s built to last!
Please note, our Reflections Glass Balustrade has been designed to suit stair pitches between 40° and 44°. As per the fitting guide, this range is designed for use in domestic situations and will fit most closed staircases with a handrail height of 900mm on the rake and 900mm on the landing.
If in doubt, please phone our office on (01691) 671020 or email us at [email protected]. We have a team of dedicated expert advisers that are on hand to help you with your latest stair balustrade project - from start to finish.
Tools and Fixings Needed
- Battery drill
- Drill bits including ø3mm, ø7.5mm, ø11mm, ø12mm, ø13mm, ø25mm and ø35mm
- Countersink bit
- Saw
- Spirit level
- Tape measure
- Clear silicone.
Fitting Guide
Handrail Installation
To start fitting the glass balustrade handrail, you need to first cut it to the required length and at the right angle. Once this is done, you need to:
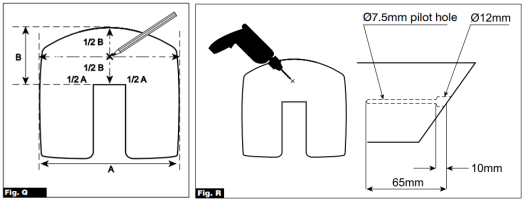
- Measure and mark where the centre of the handrail will be. It’s crucial that you get these measurements correct to make sure that you have an accurate fit. Make a note of the 1/2 measurement of B. (See Fig Q).
- On the mark you’ve made, drill a ø12mm hole 10mm deep followed by a ø7.5mm pilot hole at 65mm deep (mark your drill piece with a piece of masking tape as before). (See Fig R).
With the hole drilled, you can start to install the handrail for your DIY glass staircase:
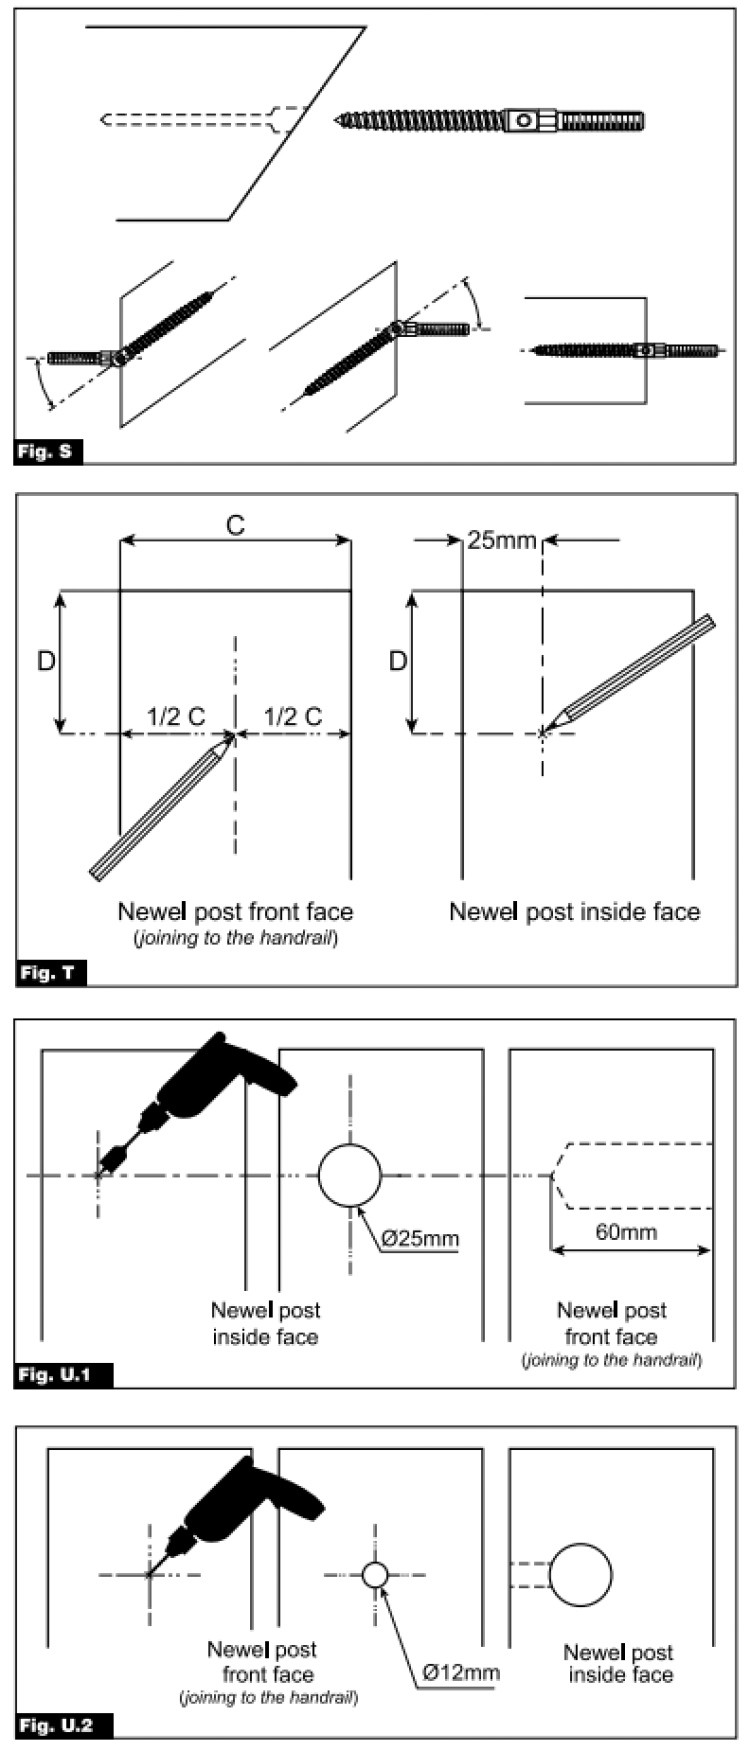
- Using a 7mm spanner, insert the threaded end into the hole you have just drilled, ensuring the hinge section can move freely. (See Fig S).
- Next, you will need to measure and mark the points at which to drill into your newel post to allow your handrail to fit in place. (See Fig T).
- Before fitting your newel post, you need to find measurement D on the front face of the newel (the side that joins to the handrail). To do this, take your measurement from before (your handrail height (1/2 of B from Fig Q)) and measure down your newel post (from the mark where the top of your handrail will sit) to the same length and mark it. Continue this mark horizontally around your newel post onto the side facing into the stairs.
- Now to find measurement C (this is the centre of the width of the newel), mark this along the horizontal line just drawn.
- Move to the side of the newel post facing into the stairs and, along your horizontal line, measure 25mm from the edge of the newel (this is the edge that is joining to the handrail) and mark it. DRILLING NOTE: Take all safety precautions when drilling.
- First, on your newel post on the side facing into the stairs, on your mark, take a ø25mm drill piece and drill a 60mm hole, making sure you create a straight and level hole. Mark your drill piece with a piece of masking tape as before. (See Fig U.1).
- Next, on the front face joining the handrail, on your mark, drill a ø12mm hole which will intersect the larger hole you have just drilled. (See Fig U.2). Ensure holes are clear of debris when doing this.
- Repeat for the other end of your handrail.
Once both ends have been fitted with the universal fixing brackets, you are ready to fix it to your newel post in your DIY glass balustrade:
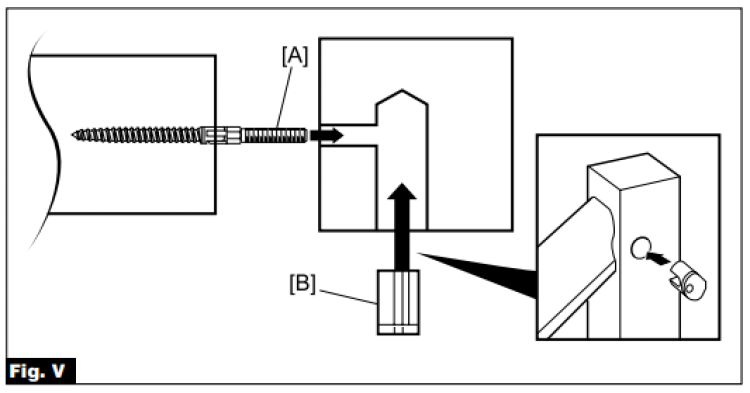
- First of all, go to the top of your stairs and loosen the newel post with the nut. This will allow a bit of movement to the newel when fitting the handrail. Take your handrail (with one of you at the top and one at the bottom) and slot the pivoting brackets into the hole on both ends. This is where you may have to tilt the newel post slightly.
- Once the handrail is in place, take your locking nuts and place them into the hole (facing into the stairs) and hand tighten using a 5mm hex key. (See Fig V).
- Remember to re-tighten your newel posts.
- Finish off by glueing in your cover buttons in all sections of your newel posts and glue on your newel cap.
- If you have used the intermediate newel, this needs to be screwed from underneath to the handrail with screws.
Glass Panel Installation
Please note, building regulations state that the gap between the glass panels and balustrade should not be more than 99mm. Also, when you are fitting the glass balustrade panels, please take care when handling due to it being glass.
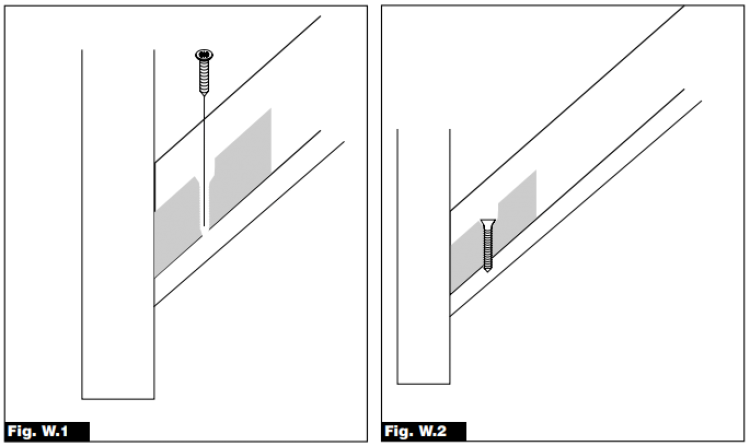
A huge part of how to install a glass balustrade on the stairs is cutting down and mitring your fillets to the required length you need. This needs to be enough to fill the gaps between the glass panels. Once you’ve done this, insert the larger of the two pieces into the grooves of the hand and base rail and slide to fit flush with the newel. Drill a pilot hole and secure with a screw. (See Fig. W1 and W2).
Repeat this on both the handrail and base rail.
To finish off fitting your glass balustrade, you'll need to:
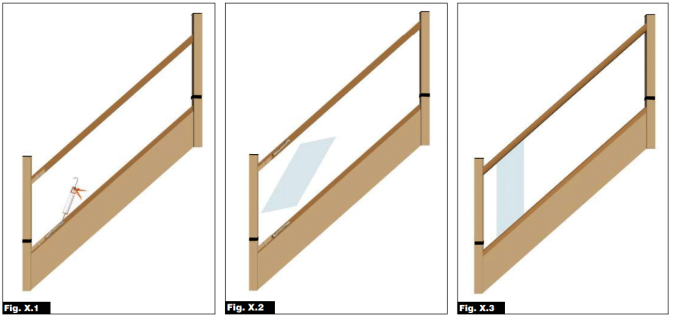
- Apply a bead of silicone into the grooves of the handrail and base rail. (See Fig. X1).
- Tilt a piece of glass at the angle and insert it into the grooves of both rails. (See Fig. X2).
- Slide the glass panel down to fit flush with your wood fillets. (See Fig. X3).
- Repeat these steps all the way up your staircase until you get to the top 3 panels, where you will need to slot all 3 glass panels in together without placing fillets in either rail. Slide up each panel separately and insert your remaining fillets. This will allow the freedom to place your last glass piece.
- To finish off, take the smaller piece of fillet and glue this in between the glass panels to seal off the hand and base fillet you have screwed in place to hide the screws and to create a perfect finish.
Conclusion
Now that the rake glass panels are installed, your DIY glass balustrade may be completed. However, if you also have a landing section, there’s a bit more work to do, which you can follow our simple steps in part 3. All of our articles for how to fit a glass balustrade are below:
- Part 1 - Base Rail and Newel Post Installation
- Part 2 - Handrail and Glass Panel Installation (current article)
- Part 3 - Landing Installation
If in doubt, please contact us today. We have a team of dedicated expert advisers who are on hand to help you with your latest stair balustrade project, from start to finish.


