
The following article will assist you when installing the Cheshire Mouldings Reflections Glass Balustrade range of staircase parts. Split into three separate articles, I've listed a table of contents and links below:
- Part 1 - Base Rail and Newel Post Installation (current article)
- Part 2 - Handrail and Glass Panel Installation
- Part 3 - Landing Installation
1 - Introduction
A simple way to renovate your hallway this autumn is by installing the popular Reflections range of glass balustrade. Not only is it simple to install for those competent in DIY, but the glass panels will give your room a brighter, renewed sense of space. Forget traditional wooden spindles and opt for something a little more contemporary and modern for your home. The following guide contains installation instructions for the base rail and newel posts in the rake section.
Here at Blueprint Joinery, we stock everything you’ll need to install your new staircase with ease – glass panels, handrails, base rails, newel posts, fixing kits and more.
Please note, Reflections Glass Balustrade has been designed to suit stair pitches between 40° and 44°. As per the fitting guide, this range is designed for use in domestic situations and will fit most closed staircases with a handrail height of 900mm on the rake and 900mm on the landing.
If in doubt, please phone our office on (01691) 671020 or email us at info@blueprintjoinery.co.uk. We have a team of dedicated expert advisers that are on hand to help you with your latest stair balustrade project; from start to finish.
2 - Tools and Fixings Needed
- Battery drill
- Drill bits including ø3mm, ø7.5mm, ø11mm, ø12mm, ø13mm, ø25mm and ø35mm
- Countersink bit
- Saw
- Spirit level
- Tape measure
- Clear silicone.
3 - Fitting Guide
3a - Post to post stairs installation
This range has been designed to suit stair pitches between 40° & 44°.
The Reflections range can be installed using your existing staircase newel bases. If the existing newel bases are to be used, they must be:
- Positioned central to the stair string and front edge of the riser concerned
- A minimum of 90mm x 90mm square. If they measure less the sides will have to be built up using suitable material. (See Fig A)
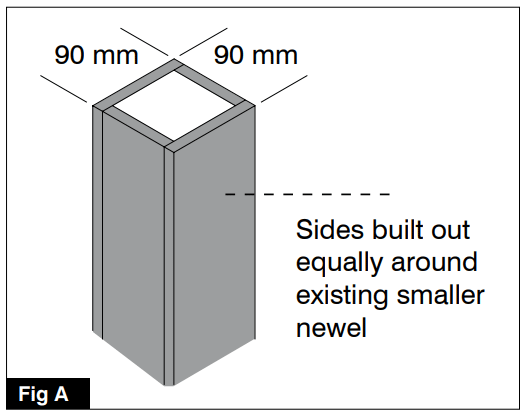
Newel post must be positioned central and a minimum of 90mm x 90mm square
If your stairs are greater than 2400mm long, you must use an intermediate newel base which will typically be located halfway up your staircase (in most cases a new newel base will have to be installed).
To obtain the correct height for your newel bases:
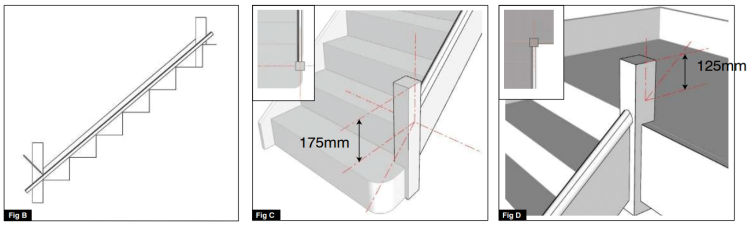
- Draw a line continuing from the top of your base rail through the bottom and top newel bases. Find the centre point of your newel on the side facing into the stairs and measure the following dimensions up from this point. (See Fig B)
- The bottom newel base height is set at 175mm from the top of the base rail at the centre point of the newel. (See Fig C)
- If you are using an intermediate newel base on your stairs set the intermediate newel base height to 150mm from the top of the base rail at the centre point of the newel.
- The top newel base is set at 125mm (from the top of the base rail at the centre point of the newel. (See Fig D)
Follow steps 1, 2, 3 and 4 above to obtain the correct height for your newel bases
If you are using an existing 90mm x 90mm newel base:
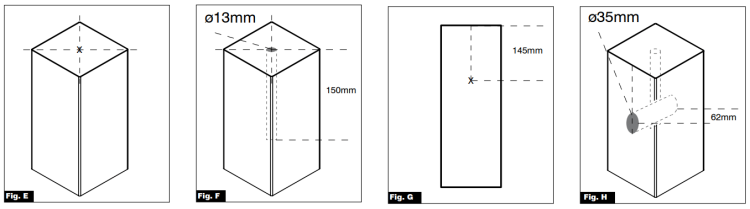
- On top of the newel draw a line from corner to corner to locate the centre of the newel. (See Fig E)
- Measure and mark 150mm on your ø13mm drill piece with a piece of masking tape (this will be your depth) and drill down through your centre point of your newel to your required length. (Note this hole must be drilled straight). (See Fig F)
- Now on the side of the newel (the side facing into the stairs), measure and mark the centre of the width.
- Using your centre mark (this must be accurate) measure down 145mm and mark. (See Fig G)
- Use this mark and drill a ø35mm hole - 62mm deep (mark your drill piece with a piece of masking tape as before). (See Fig H)
- Repeat all steps for remaining newels.
Follow steps 1, 2, 3, 4 and 5 above when using an existing 90mm x 90mm newel base
3b - Base rail installation
Hold the base rail in position beside the newel posts running at the angle of the string, mark where the join of the base rail and the newel base meet and cut to length.
Ensure that your base rail is central on your string, drill your counter sink screw holes in the groove of the base rail all the way up at regular intervals. Once you have done this drill your pilot holes through your base rail and straight into your string. (See Fig I)
Before securing your base rail to your string ensure all debris has been removed from the grove of your base rail and underneath.
Screw the base rail to the string making sure the screws do not protrude into the groove. (See Fig J)

It is important that the screws do not protrude into the groove of the base rail
3c - Newel post installation
To install the newel post at the top and bottom of your stairs:
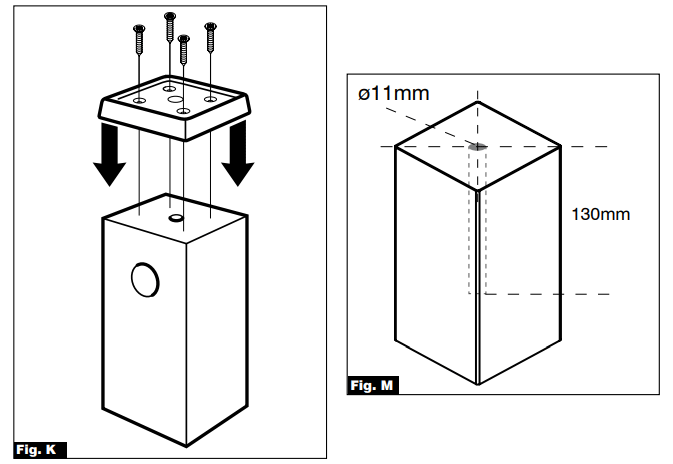
- Place the newel base connector (RFBASE) on to the top of your newel base and with a pencil mark your holes and remove the connector, using a 3mm drill bit, drill pilot holes, replace the newel base connector to your newel base and fix using screws. (See Fig K)
- Next take the top section of the newel post and locate the end that DOES NOT have the predrilled hole in and find the centre of the newel (by drawing from corner to corner).
- On this mark drill a ø11mm hole - 130mm deep (mark your drill piece with a piece of masking tape as before). (See Fig M)
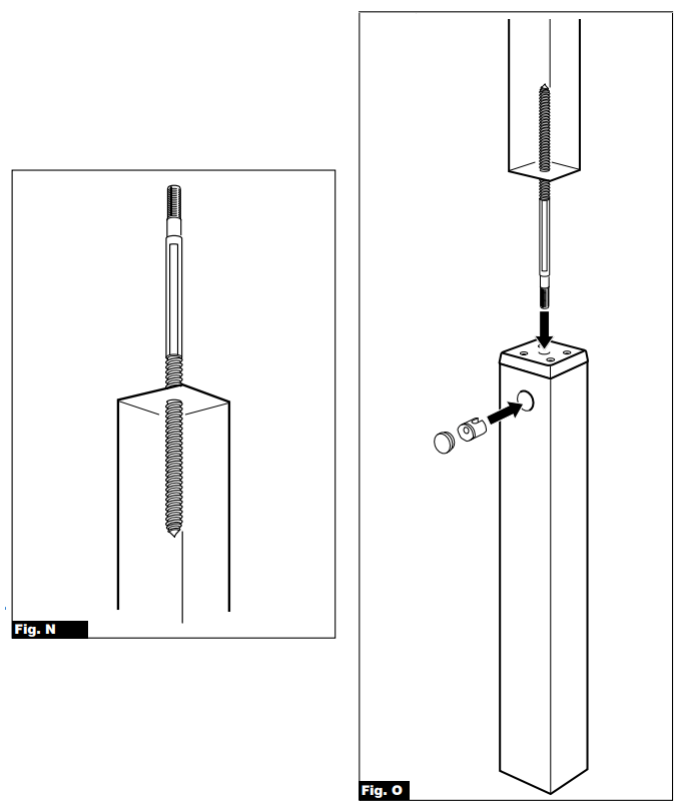
- Take the long screw and insert it in to the hole you have just drilled and with your 10mm spanner insert the screw into the hole and tighten ensuring 15mm of thread is left protruding from the newel post (Do not over tighten past this point as there is a chance you may split the wood). (See Fig N)
- Now take your newel post and insert the bolt fixing through the centre hole of your newel base connector and slot into place. Using the hex key supplied and the fastening nut, insert the nut into your ø35mm hole and with your hex key hand tighten until you have no movement in your newel post (Always support your newel post at all times when doing this step). (See Fig O)
- Repeat these steps for fixing both the top and bottom of the newel.
Follow steps 1, 2 and 3 in order to prepare the newel base for the newel post
Follow steps 4 and 5 to connect the newel post to the newel base
3d - Measuring and marking
Using two people (one at the top of the stairs and one at the bottom) hold the handrail in position just above the base rail next to the newel posts running at the angle of the string. Mark where the join of the handrail and the newel base meet. Before you do anything else, add 8mm to your length (this will take into effect the size difference between the newel base and the top part of the newel) now cut to length ensuring a straight finish. (See Fig P)
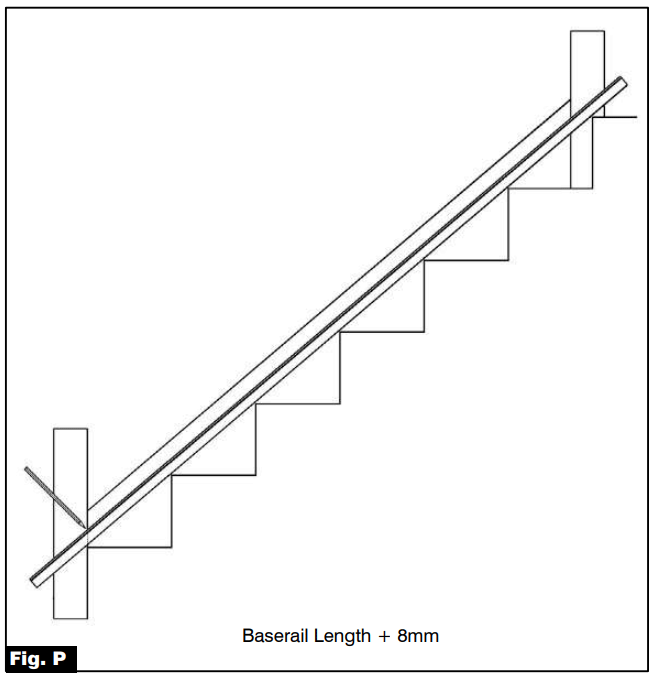
Make sure to have someone to help when measuring and marking
Now each of you take a piece of raked glass panel (one at the top of the stairs and one at the bottom). Slot a raked glass panel at the top (of the stairs) and one raked glass panel at the bottom (of the stairs) into the base rail (always support the panels to prevent any accidents).
Place your handrail over the top of your glass panels and slot between the newel posts and mark the top of the handrail on the newel post at both ends. This mark will be where the top of your handrail will sit. Also mark the underneath of the handrail; this mark is used for the measurement of the intermediate newel.
Please note, if you are using an intermediate newel, please carry on with the instructions below. If you do not need an intermediate newel, please go to Part 2 - Handrail and Glass Panel Installation.
You can now remove the glass panels.
3e - The intermediate newel
Using the lower of the two marks which you have just drawn on your newel post measure the length of your newel from the lower mark down to the newel base connector (RFBASE). Using the measurement, you have just taken, take off an extra 30mm from the length of your measurement (for example if your measurement between the lower mark and the top for the newel base connector is 680mm take away the measurement of 30mm) this will allow for the height of the bracket. (Double check your measurements before cutting as this needs to be an accurate fit). (See Fig. P1)
Measure the length you require on your intermediate newel on the side with the rake, ensuring you are measuring down the centre of the side. (See Fig. P2)
Cut to length on the bottom end of the newel (the one without the rake) ensuring a clean straight cut.
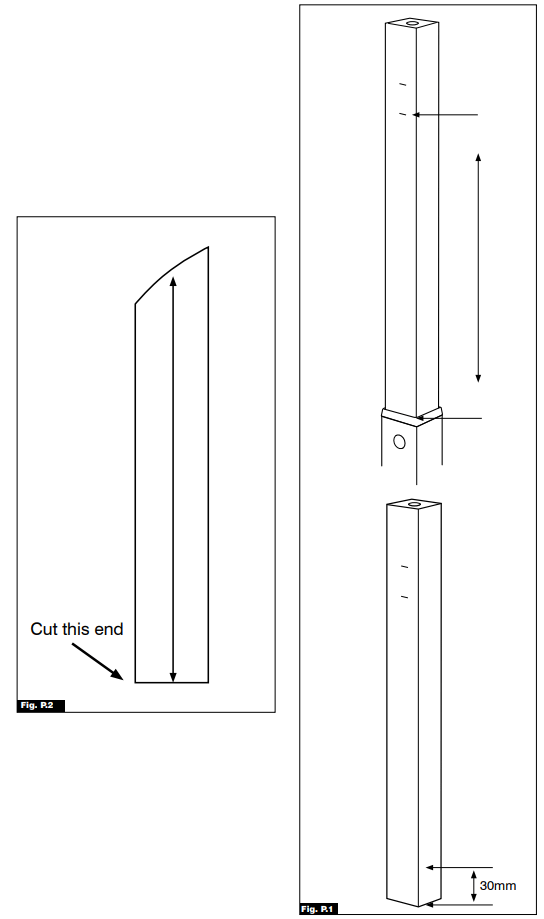
It's important to check your measurements as this needs to be an accurate fit
3f - Intermediate post installation
To install the intermediate newel post:
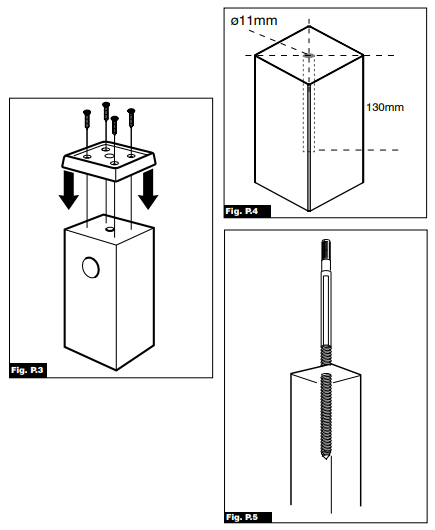
- Place the newel base connector (RFBASE) on to the top of your newel base and with a pencil mark your holes and remove the connector, using a 3mm drill bit, drill pilot holes, replace the newel base connector to your newel base and fix using screws. (See Fig. P3)
- Next take the top section of the newel post and locate the end that DOES NOT slant and find the centre of the newel (by drawing from corner to corner). (See Fig P.4)
- On this mark drill a ø11mm hole - 130mm deep (mark your drill piece with a piece of masking tape as before). (See Fig. P4)
- Take the long screw and insert it into the hole you have just drilled and with your 10mm spanner insert the screw into the hole and tighten ensuring 15mm of thread is left protruding from the newel post (do not over tighten past this point as there is a chance you may split the wood). (See Fig. P5)
- Now take your newel post and insert the bolt fixing through the centre hole of your newel base connector and slot into place.
- Using the hex key supplied and the fastening nut, insert the nut into your ø35mm hole and with your hex key hand tighten until you have no movement in your newel post (Always support your newel post at all times when doing this step).
- Once this is done place the pivoting bracket on top of the slant and mark the 4 holes, using a 3mm drill bit, drill pilot holes, the screw the bracket into position.
4 - Conclusion
With the base rail and newel post installed, the focus is now on the handrail, glass panels and landing section. Split into three separate articles, you can find the other 2 articles below:
- Part 1 - Base Rail and Newel Post Installation (current article)
- Part 2 - Handrail and Glass Panel Installation
- Part 3 - Landing Installation
If in doubt, please phone our office on (01691) 671020 or email us at info@blueprintjoinery.co.uk. We have a team of dedicated expert advisers that are on hand to help you with your latest stair balustrade project; from start to finish.